Network documentation

Know which port that cable lands on.

Build rack elevations by dragging devices in. Trace a cross-connect from a switch port, through a patch panel, across the campus to the meet-me room. Keep the site plans, cable pathways and credentials with it — instead of in a spreadsheet nobody trusts.

From $9.99/month. Cancel any time, from inside the app.

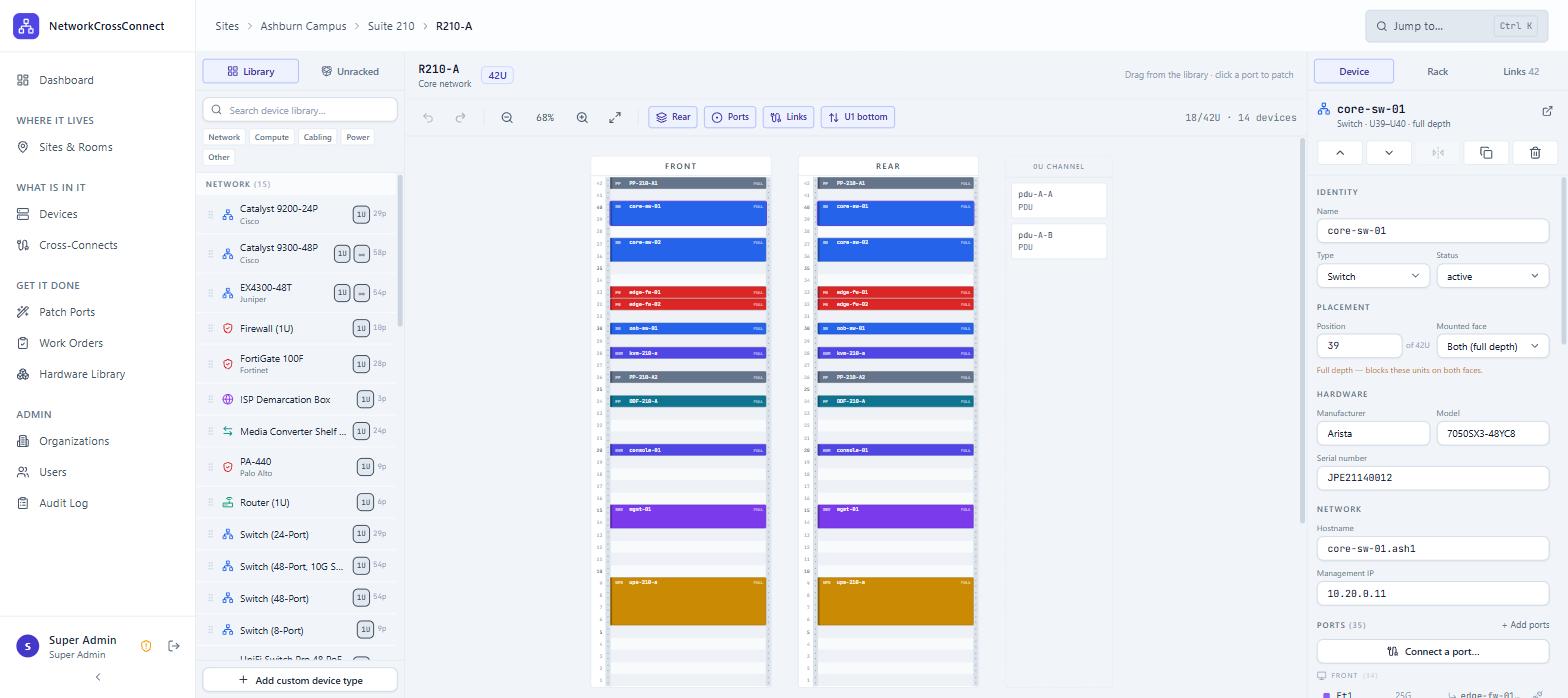
Sites › Ashburn Campus › Suite 210 › R210-A
The rack designer showing R210-A: front and rear elevations side by side, a device
                library on the left to drag from, a 0U channel holding two vertical PDUs, and the
                selected switch open in the inspector on the right.

Built for the cabling nobody else documents

Asset lists tell you a switch exists. They do not tell you that port 24 runs to the second-floor IDF, or which strand of the riser it lands on. That is the part that gets lost.

Rack elevations by drag and drop

Pull a 48-port switch from the device library into U20. Front and rear faces side by side, full-depth gear on both, and 0U vertical PDUs in the rear channel where they belong.

Cross-connects, end to end

Click a port, pick the far end — same rack or a different building. Every cable carries its ID, type, colour and length, and both ends resolve to rack, room and site.

Patch panels with two real sides

Front ports take the patch leads, rear ports terminate the permanent cabling. The panel shows on the rear face even when it is front-mounted — because that is where you stand to trace it.

Room plans and cable pathways

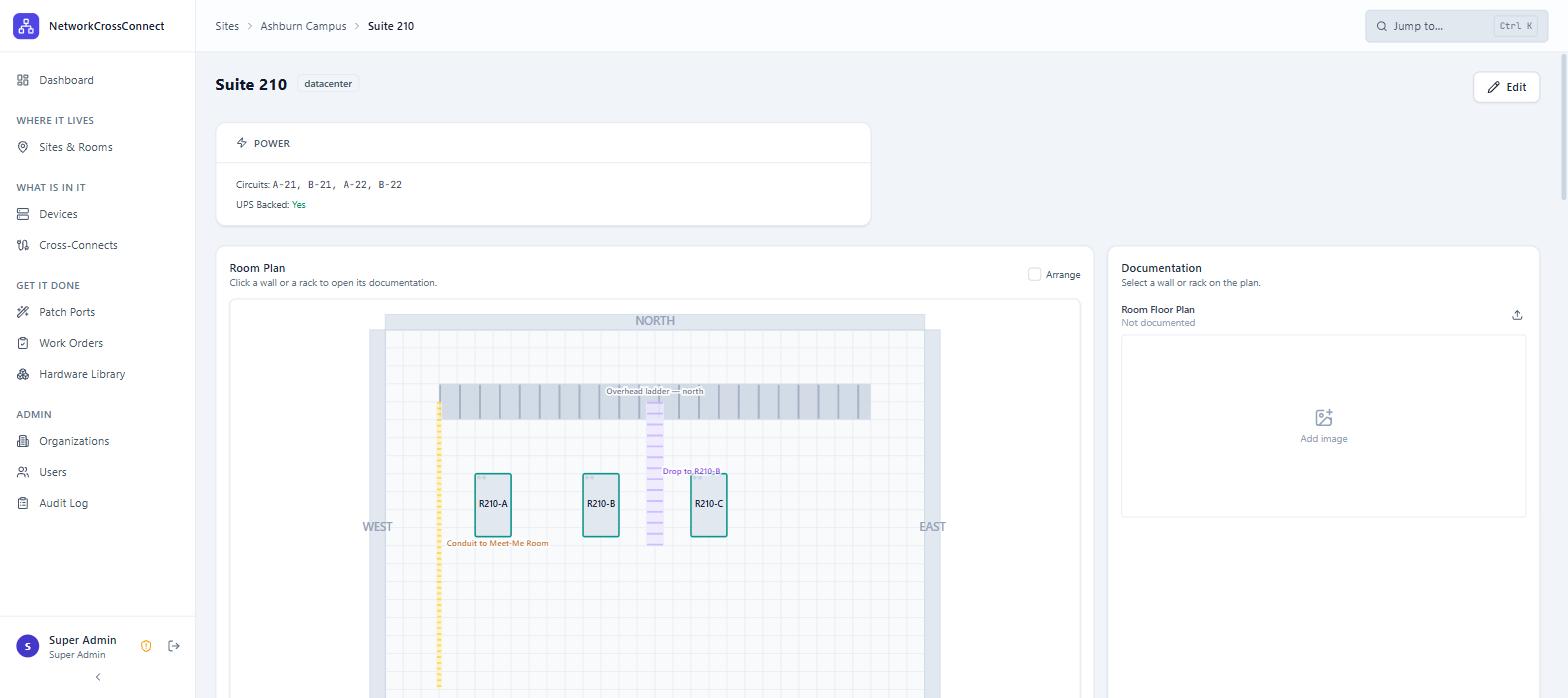
Lay out racks on a scaled floor plan and route the overhead ladder, tray, basket or conduit runs above them — with widths, mounting heights and corners.

Campus cross-connect map

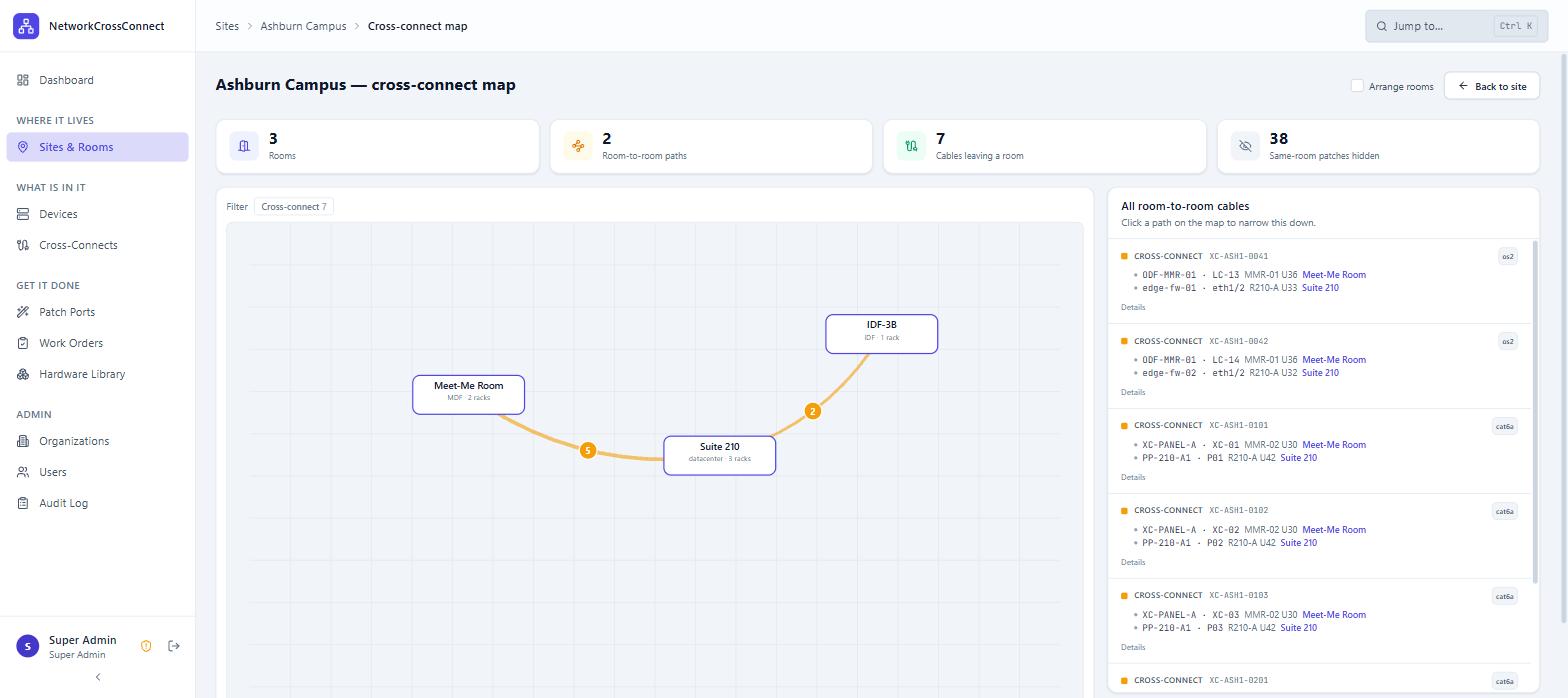
Place each room on your site plan and see only the links that leave a room. Same-room patching stays out of the way so the risers and carrier handoffs actually stand out.

Credentials that stay with the device

SSH, Telnet, serial console, iDRAC, iLO and web UIs — with encrypted passwords, one-click connection links, and every reveal recorded in the audit log.
What it actually looks like

Every screen below is the running product against a two-hall colocation site — three rooms, six racks, and the cables between them.

Campus map

Only the cables that leave the room

A rack diagram cannot show you a run that ends two rooms away. This one draws just the room-to-room paths and puts a count on each, so the forty-odd patches inside a single rack stay out of the way.

  • Same-room patches hidden, and counted so you know they were not lost
  • Click a path to narrow the list to those cables
  • Drag rooms onto a scanned site plan to lay them out for real
Ashburn Campus — cross-connect map
Campus cross-connect map: three rooms joined by curved paths labelled with cable
                    counts, beside a list of every room-to-room cable with both endpoints named.
Cross-connects

Both ends, on one line

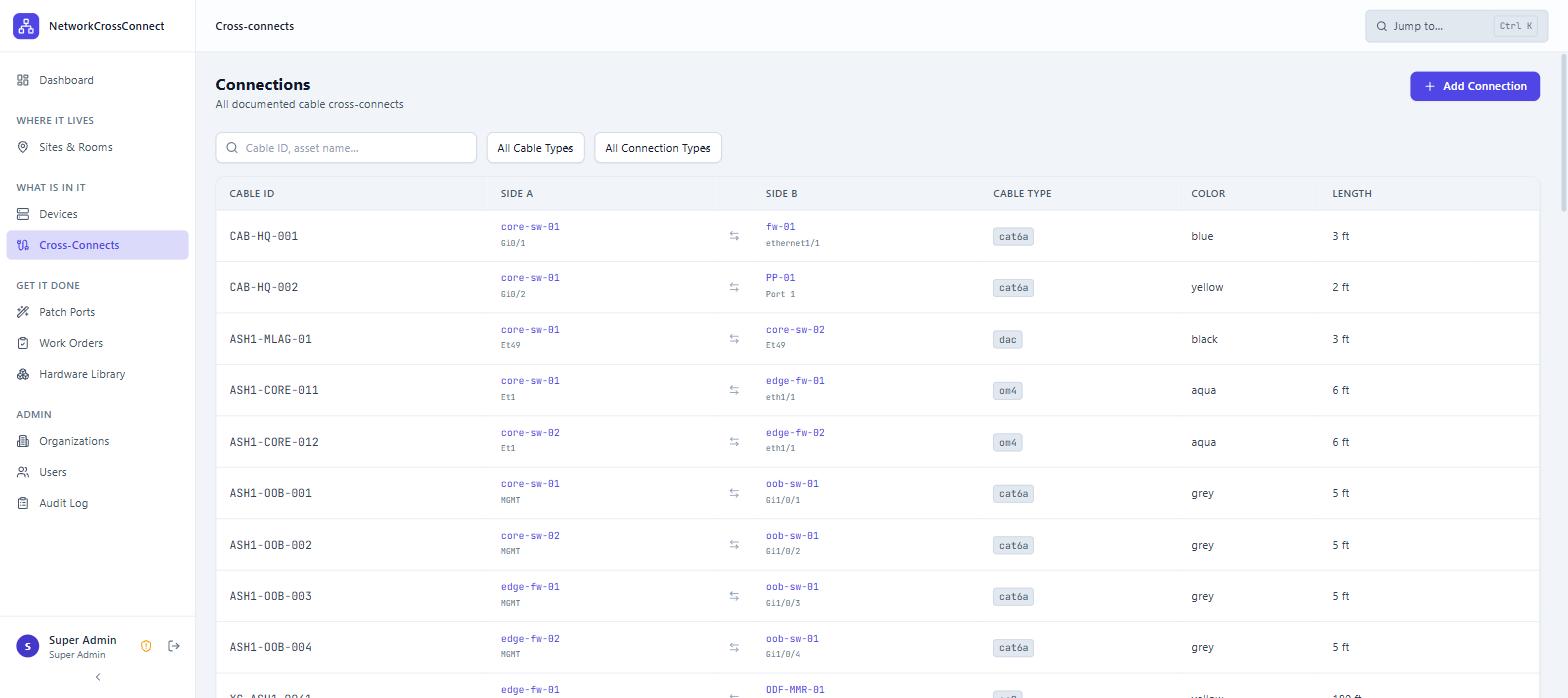
Every cable carries its ID, the device and port at each end, its type, colour and length. Search by cable ID when someone reads one off a label, or by device name when all you have is the box.

  • Cable IDs you can hand to remote hands over the phone
  • Port-level ends, not just “switch to patch panel”
  • Deleting a cable frees both ports, so nothing is left half-patched
Cross-connects
The cross-connect list: a table of cables, each row showing cable ID, the device
                    and port on each side, cable type, colour and length.
Room plans

Where the racks stand, and what runs overhead

Place racks on a scaled floor plan and draw the ladder, tray, basket and conduit runs above them. When a new circuit needs a path, the pathway is already documented.

  • Four pathway kinds, each drawn at its real width
  • Height above floor recorded per run
  • Click a rack on the plan to open its elevation
Suite 210 — room plan
A scaled room plan for Suite 210 with three racks placed on the floor and
                    labelled cable ladder, basket and conduit runs drawn overhead.
Search

One shortcut to anything

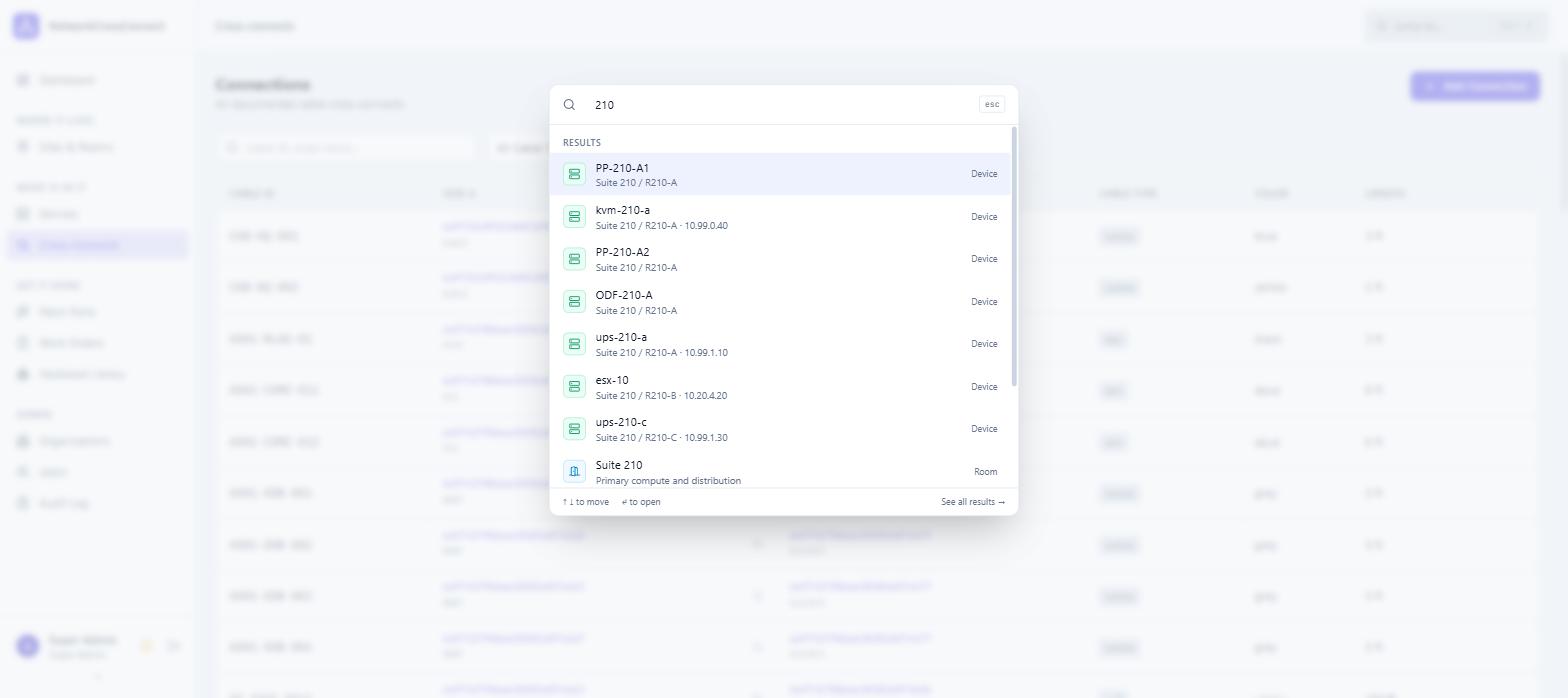
Ctrl K from any screen. Type part of a rack, device, port, cable ID or room and go straight there — each result carries the site and rack it lives in, so you pick the right core-sw-01 out of the four that exist.

  • Searches devices, ports, cables, racks, rooms and sites at once
  • Matches IP addresses, serials, MACs and cable IDs, not just names
  • Opens on what you looked at last when the box is empty
Jump to…
The jump-to palette open over the app, listing matching devices and rooms with
                    the site and rack each one belongs to.

Straightforward pricing

Two plans. No per-device charges, no setup fee, and cancellation is a button in the app.

Single

One engineer looking after a handful of sites.

$9.99/month

Billed monthly · USD

  • 1 user
  • Up to 5 locations
  • Unlimited racks, devices and cross-connects
  • Room plans and cable pathways
  • Encrypted device credentials
  • Shared device library
Choose Single

A location is a site — a building or campus with its own rooms and racks. Move between plans at any time; upgrades apply immediately and are prorated.

How it works

Four steps from signing up to tracing your first cross-connect.

  1. Create your account

    Name, email, a password. Nothing else to fill in.

  2. Verify your email

    We send a link. It expires in 24 hours and works once.

  3. Choose a plan and pay

    Card details go straight to Stripe — they never touch our servers. You will see the exact amount and the renewal date before you confirm.

  4. Add your first site

    Create a room, drop a rack in, drag devices in from the library and start patching.